Monday, 18 June 2012

Party Feet Beauty Cream Is Yum!

Party Feet Foot Moisturiser


Hi Everyone!

So I came across this fabulous foot moisturiser and thought I would share it with you. I'm always into foot scrubs and lovely stuff to make my tootsies pretty, so when I came across this gorgeous smelling papaya scented cream from Party Feet I was kinda happy. I don't usually like their products (sorry PF, but their foot cushion thingies are just terrible and don't make any difference to the comfort of my high heels!).

Apply after showering or bathing and rub this into the bottom of your feet, and anywhere around that area that needs a bit of a moisture and tlc. The product claims to have instant results, and it actually did make any dry areas instantly appear smooth and silky. It didn't last forever, but as a quick pick me up this is a great product. It has almond oil and panthenol in it which supports the regeneration of the skin, and a deep moisturising of the feet. Did I mention this smells fabulous? Yes, I believe I did. Draw back is the smell kinda makes me want to eat it...

Love and Light

~ Miss Christina C ~

Monday, 14 May 2012

Chillin' On The Moon and May Favourites

Hey guys!

So...I have been missing right?!...I am still here, have had a crazy couple of months. Went to Vegas, had a fabulous time, came back, and sort of neglected my blog. I have also been writing for In-spirels Magazine which you can check out here: http://www.in-spirelsmagazine.co.uk/?p=14322 But now I am BACK :)

So what's new? Well here are my fabulous favourites for May.

Percy and Reed


I bought Glamour magazine last month and this came with it as a free gift, I didn't think it would be that great, but thought there was no harm in trying it out. I washed with it after using hair dye, and I couldn't believe how amazing it was. Not only did it moisturise my hair but it made it look so shiny and silky, I am absolutely in love with it. The bad news is it costs £14.50 a bottle...but it might be a worth while investment. You also don't need to use much, I have super long hair and get away with using a 10p sized amount, just add lots of water for it to lather up.


Sally Hansen Mega Shine Top Coat


I have been a fan of the Sally Hansen Insta-Dri for a while, and found nothing on this planet that could top it. Until now. Not too surprising, its yet another gem from the Hansen range. I apply the Mega Shine on to any nail varnish as a top coat and it really REALLY does make it last a lot longer and does give it a shiny "just manicured" finish that lasts. My pet peeve is when I've taken so much care and time to give myself a manicure and it chips within hours. We all know about that don't we...well, not with this. I did the washing up, dyed hair, and opened cans all within hours of using it, and it stayed put. Chipping started after about 5 days which in my world is pretty awesome. The only annoying thing is that unlike the Insta-Dri you can't apply it to your nails 2 minutes after your manicure, you have to wait for your nail varnish to dry completely first. So not so great if you are in a rush, but if you have about 20 minutes to spare, USE IT! Grab one for £6.39 at Boots.

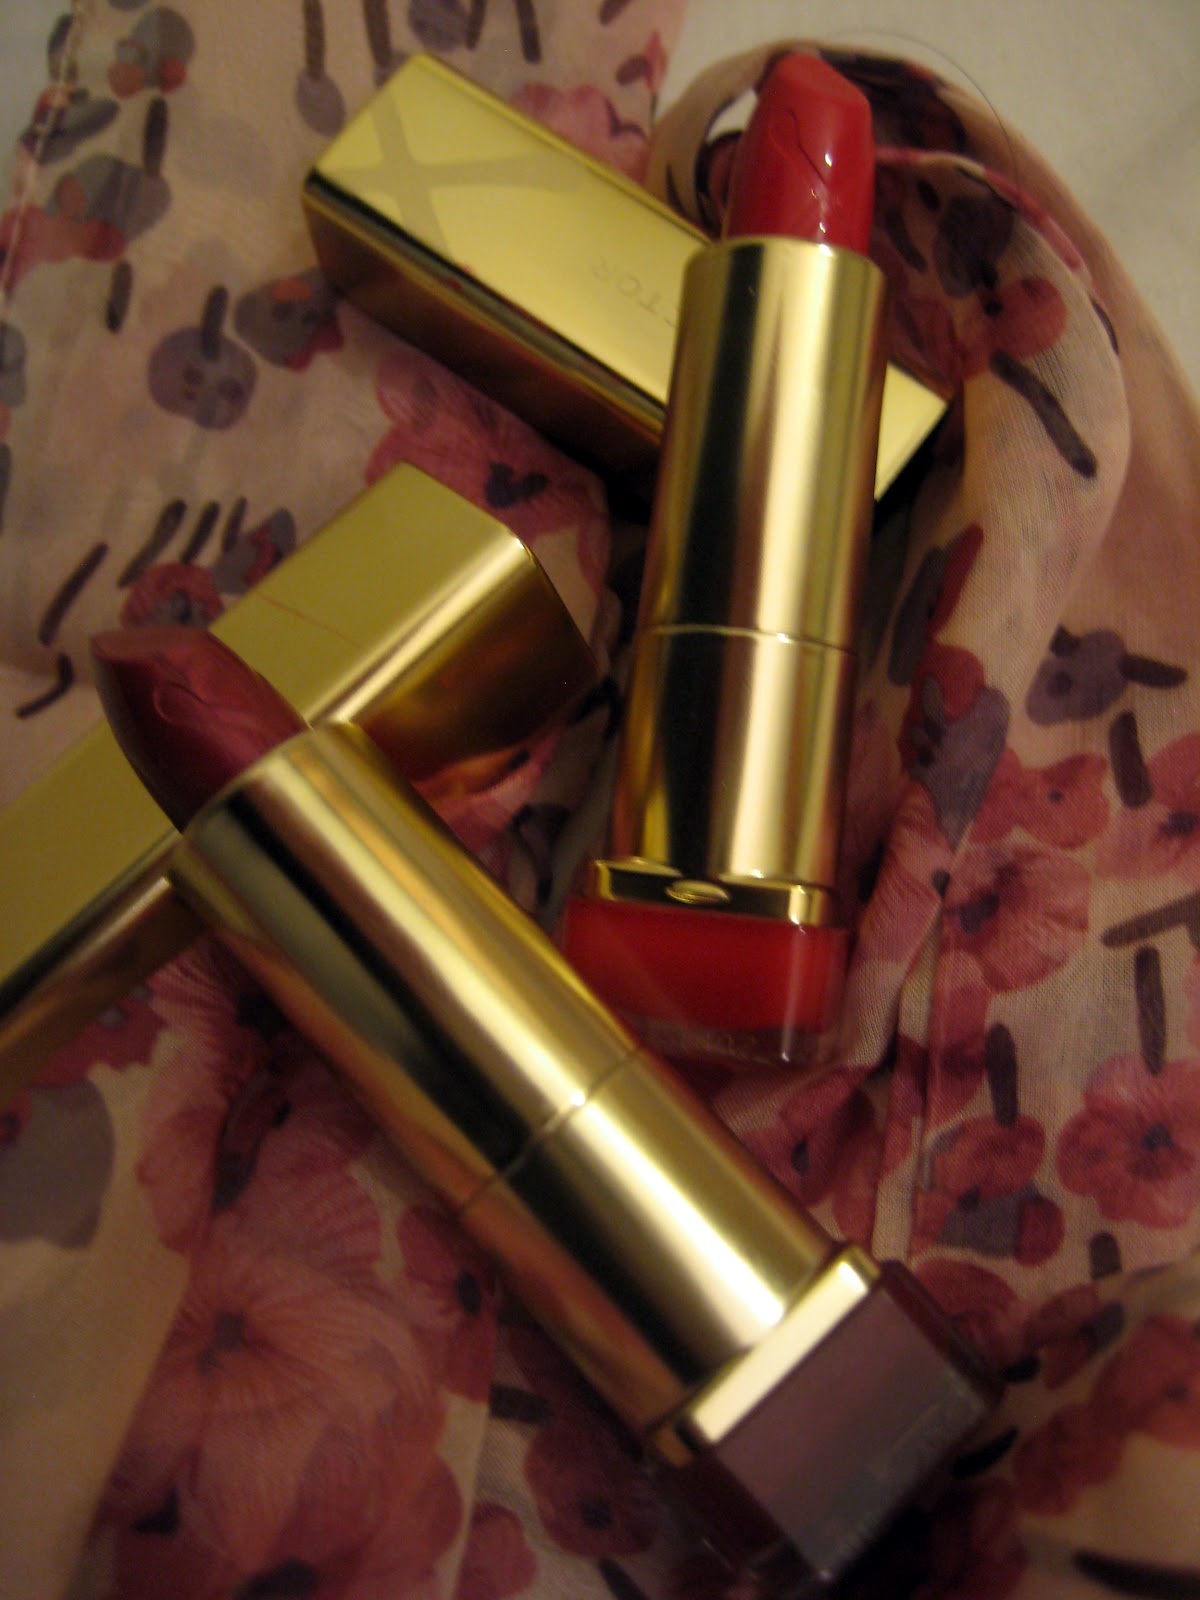
Maxfactor Colour Elixir Lipsticks


I wanted a deep classic red (no blue undertones) but plum coloured lipstick that was moisturising, which I couldn't find anywhere - yes I am hard to please. Playing around at the Maxfactor counter I found that if I mixed two of their new colour elixir colours together, I got such a result. Staying power, moisturising, and just a gorgeous colour. I picked out Ruby Tuesday and Mulberry, at £7.99 each. They are lovely by themselves too, I'm just being picky...

Pure Coconut Oil


So we all have seen or used coconut products in the form of moisturisers, but have you ever thought of using it in its pure form? I have been using coconut oil for a couple of years to cook with, as it really benefits me health wise, but I hadn't considered using it on my skin until I saw a friend open up a jar right there in a pub and start applying it to his hands. After laughing my promarni off, I realised that it wasn't actually that weird. Ok I probably wouldn't go as far as to get my jar out in public and lather myself up with it, but I would use it at home. It's really great on dry patches of skin, and is super moisturising. Cook with it, moisturise with it, use it for dry ends of your hair when you wash it, the list is endless! I get this brand from my local Asian shop, its around £4 a tub which is brilliant. You can also find them in various organic shops, and the world food isles in some supermarkets.

Body Shop Earth Lovers Pear & Lemongrass Shower Gel


I love the body shop for beauty products they just smell divine, and this is from their new Earth Lovers collection. The product is biodegradable, so safe for our beautiful planet, and safe for you. This scent is my favourite and makes you feel really fresh in the mornings. I alternate between this and the Body Shop's giant bottle of strawberry shower gel, which I have loved since a child. Thumbs up.

Nivea Pure and Natural Cleansing Toner


Nivea Pure and Natural Cleansing Toner is really great at getting rid of daily dirt and grease build up especially from makeup. I have oily to combination skin down my T-zone, and dry around my cheeks, so it can be challenging to find one toner that works for all areas, but this has done the trick.It takes a great product to take me away from my trusted Clinique Anti-blemish Solution toner, so this must be really really awesome. I use it after removing my makeup at night, and in the morning before applying it. It's really light and refreshing, but isn't harsh on the skin either, just leaves you feeling like you've had a cucumber facial - lovely! I purchased it for £3.29 at Tescos, but you can get it pretty much anywhere that sells Nivea products.

Hope you enjoyed this blog! If you have then please do subscribe to it by clicking 'join this site' on the top right of this page.

Love ya long time!

~ Miss Christina C ~

Thursday, 1 March 2012

My Fashion Wish List For Spring

My Fashion Wish List For Spring

Look One


1. H&M Dress £19.99 - this looks so cute for spring, great shape too
2. Asos Colour Block Floppy Hat £15.00 - I love a floppy hat, and these colours are yum
3. Zara Bucket Shopper £39.99 - I've had my eye on this bag for a while...

1. Lipsy Fabric Wrap Platforms £85.00 - these are soooo pretty and would compliment the dress so nicely. Please be in a sale soon please?!
2. H&M Necklace £7.99 - I have been looking for a gold choker style necklace like this for a while so I will be purchasing this asap.
3. Zara Plaited Chain Belt £19.99 - I really like the simplicity of this versatile belt.


Look Two

1. Office Mint Suede Spike Court Shoes £68.00 - Oh I love these I love LOVE these. Gorgeous mint pastel colour, on trend, and I think would look great with this outfit.
2. American Apparel Disco Pants £70.00 - I have seen these around for a looong time, them seem so versatile, and I actually finally gave in and ordered them last night. Hooray!
3. Lipsy Oui Oui Top £32.00 - This top is so cute, I think it would look great with this outfit and I'd love to get my hands on it.

1. Chanel Black Quilted Bag from £1,580 - So. Unless I win the lottery I will never own this bag, but I have lusted after it for about 7 years, and it is just so stunning. In my dream world I would pair it with this outfit...
2. H&M 3 pack bracelets £3.99 - My three favourite cities, how could I not love these?
3. River Island Leather Jacket £140 - I saw this at the beginning of January and I have stalked it ever since. I think it would look great with this outfit. So versatile, so gorgeous, so leather, so me.

I hope you enjoyed this post, and I hope I haven't now emptied your piggy bank.

Please do subscribe to this blog by clicking the "Join this site" button on the top right hand corner, it will make me smile!

Love and Light

~ Miss Christina C ~


Wednesday, 25 January 2012

Short Video of me as MUA at the ODF clothing shoot - how to create a photo ready natural day look

Hey everyone!

A very quick video of me talking about how to achieve a natural makeup look that will work under the bright lights of an indoor photoshoot, and which products I used to achieve this look.


Clothing brand: ODF clothing
Photographer: Eric Jorrin
Model: Hannah Burdett
Videographer: TJ Morgan
MUA: Christina Chrysanthou (me!)

If you enjoyed this post, please click on the 'subscribe to this site' button on the top right!

Love

~Miss Christina C~

Saturday, 14 January 2012

Sally Hansen INSTA - DRI Review


Sally Hansen Insta - Dri Top Coat

So I thought I would tell you guys about this little discovery I made a couple of months ago. I know this product has been out for ages, but since I was slow to use it myself, and absolutely think it's the best thing since...since...food, I am going to have to do a review on it!

What is it? 

This is a clear nail top coat with a twist. It dries any nail polish within 30 seconds of applying the product to the nail. It retails at £6.08 in Boots, but I have seen it on sale sometimes for as much as half price, and it is also available from most drugstore's in the UK and the US.

They say the only time a woman is completely useless and at your mercy is when she is waiting for her nail polish to dry - not anymore! Ever get pushed for time perhaps before an important meeting,date,night out and think "my outfit looks great, I look great, but I need THAT colour on my nails...but wait... it's not a dry fast varnish and I need to leave the house like... 25 minutes ago!" Fear not! You can now wear your favourite polishes without having to worrying about how insanely long they take to dry. Yes, of course there are more important things in life, but hey this is a beauty blog!

The Positives 

It does exactly what it says on the tin. After applying your nail varnish (this can be any brand), wait 2 whole minutes before applying the Insta - Dri polish over the top. Wait just 30 seconds, and your nail polish will have dried COMPLETELY. I have never come across a nail drying product that actually works so instantly, and it has been such a gift from the beauty God's for me. I have not found any other product that actually dries my nails so fast, and I've tried all the sprays and crazy techniques out there. Your nails will look shiny, and any weak nails will appear harder - Horray!

This has been so useful for me as I'm one of those women that leaves painting my nails until 5 minutes before leaving the house (I know you do it too, don't lie!). I end up smudging my efforts by trying to put my shoes on with wet nails, and get varnish on everything in sight including my white coat- lovely. This has stopped all of the later from happening, and means I can still give myself a last minute manicure. I have even done this on a train when I'm running super late for an audition. No really.

The Negatives

There aren't really any to be honest, apart from, if you are using a nail varnish that is particularly thick and 'gloopy', and you have applied more than one coat, you might want to wait an extra minute before applying the Insta - Dri. This is because I find it can get on the brush and then get into the bottle of your Insta - Dri, and that gets a little messy. Also, I would wait longer than 30 seconds in this case before getting up and using your hands for anything. Another minute should be enough, by then you can be sure that your varnish is super dry, and non transferable. 

Another negative is that I find you have to use quite a lot of product to get the 'shiny top coat effect', but this is a small sacrifice for its super fast drying properties.

Please subscribe to my blog if you have enjoyed this review, you can do this by clicking the "Join This Site" button on the right of this page. You don't need to have a blog to do this :)

Please feel free to leave comments - I love reading others opinions on any products I review!

Thank you for reading!

~Miss Christina C~


Friday, 6 January 2012

Mac Pigments - how to use them for different skin tones

Hi Everyone!

I have been wanting to blog about Mac pigments for a while, so I thought I would pick my three current favourites, and tell you guys why I think each colour is perfect for different skin tones, and how I like to apply them to create different looks.


I find with all Mac pigments that if you wet your brush slightly before use (with a face wipe, or a drop or two of water- don't immerse it) the colours come up a lot more vibrant, metallic, and pigmented. It also makes it easier to pick up the colour onto your brush, as they can get a bit messy. You can of course use the pigments dry for a less dramatic look. Also I advice using tape under the eyes, or leaving your foundation and concealer until last when using these pigments, as there can be quite a bit of fall out, especially when used dry.


Kitchmas

This pigment is such a pretty colour, it's like a "barely there" pink with a lot of sparkle. If you're not brave enough to experiment with darker colours, I'd go for this one as it's simply gorgeous and girly, and will jazz up your eyes for a night out without looking over done. I recommend using it with Mac's eyeshadow Vanila all over the eye, then adding Kitchmas to the outer part of the eye, and blend it into the socket area. You can add a shimmery white shadow to the inner corners of the eye, such as White Frost. This look is to be kept simple but polished, so I would then add a very thin line of brown or black liner to the water line of the lower and upper lashes, and mascara. Kitchmas is great for pale skin tones, those with a smaller gap between the eye and the eyebrow, and also mature caucasian skin as the pigment isn't overly strong or metallic.

Blue Storm

Blue Storm is actually my absolute favourite at the moment, especially over the party season I have been using this a lot to create a smokey eye with a twist. The pigment comes out almost like a midnight blue, and has a real metallic feel to it, depending on how you blend it. You can obviously use it alone, but I love to use it with Mac's eyeshadow Electra in the inner part of the eyelid extended to the middle, a small amount of Carbon (don't pack it on too heavy) on the outer eyelid area, then sweep over Blue Storm (with a damp brush) over the Carbon and blend into the outer eye area and over the whole socket. The key to this is to blend, blend, blend! I then use a damp eyeliner brush to extend a thin line of the pigment under the lower lashes to make the eyes the absolute star of the show. Add liner and mascara as you wish. I think Blue Storm looks especially gorgeous on dark skin tones.


Tan

The beauty of this pigment is that it suits almost everyone. Whether your skin is pale or dark, it will find a way to make you dazzle in different ways. If you have olive or tanned skin, this pigment looks so beautiful alone and will give you a sun kissed glow. Sweep it across the whole eye up to the socket (with a damp brush) and blend outwards and upwards, then underneath the lower lashes. Add a really good coat of volumising mascara such as MaxFactor False Lash Effect, and a creamy red lipstick and you're good to go. I think the simplicity of this look with the Tan pigment is just stunning.

 If you have pale skin, this pigment works really well as your darker colour when creating a golden smokey eye, rather than using a black or rustic gold, which can be too much on lighter skin tones. Create your smokey eye as usual, then add the Tan pigment to the outer eye and blend into the socket. Use a wet or gel eyeliner across the top and bottom, flicking it slightly towards the ends, add mascara, a bronzer, and a light coloured lipgloss or a lip balm with some colour such as Burt's Bees in Raspberry

For dark skin, you can get away with using this along side a burgundy - brown, such as Mac's eyeshadow Star Violet. Apply Star Violet lightly over the whole eye and blend through the eye socket, this will act as a base colour that you can build on, and will give warmth. Then add Tan pigment on top of this across the whole eyelid and extend outwards at the ends. This will give your eyes a vibrant finish. Pair with cat eyeliner flicked at the ends, mascara, pink under toned blusher, and a clear gloss. If you are feeling brave you can try a burgundy lipstick, but switch the pink blusher for a golden highlighting glow instead.


I hope you enjoyed this post!

If you have, please do subscribe to my blog! You can do this by clicking the "Join This Site" button on the top right, underneath my page views.

Thank you so much for reading!

Love and Light

~ Miss Christina C ~

Friday, 30 December 2011

New Year, New Make-Up Storage, Glam Boxes!

Hey dolls!

Hope you all had a great Christmas and are looking forward to the new year ahead. I treated myself to two Glam Boxes that have completely revolutionised my dressing table and cosmetics organisation. If like me your dressing table looks like a bomb has hit it due to overload of beauty products, makeup, and so on, you might find this storage system handy! I really do wish I had discovered these earlier.


They look gorgeous, and are made from acrylic rather than plastic so they will last, and are pretty sturdy. They consist of seven drawers, with the top draw opening up, so you have the choice to store your belongings with the lid closed or open for taller objects like I have.  I organised mine with each draw being used for a specific type of product that I have, and I have found that it makes getting ready for any event a fraction of the time it used to be, with no faffing around looking for things I couldn't find! They were so brilliant for organising my makeup that I got another one for other cosmetics such as perfumes, nail varnish and eyelashes. You could pretty much store anything in them, I even use a drawer for rings.


This type of box is also featured on Keeping Up With The Kardashians as the "Clear Cube", and has caused a craze amongst beauty bloggers, but rather than costing £200 each which the one's they use on the show (crazy!), the Glam Box is a fraction of the price. I got mine from ebay and they delivered them right to my door which was brilliant, and very kind of them as they went out of their way to do this (I was buying two and so wanted to cut costs on postage on the offer they were doing at the time). You can also buy them from their website also for £89.99 each with free postage and packaging, so it works out about the same. Much better!


I hope you guys enjoyed this post, I in noway am affiliated with the company who make these, I just came across them and figured I'd tell you guys about them if you, like myself, have been looking for such a product and couldn't find one.

Happy New Year To All! 
May All Your Dreams Come True In 2012!

Love and Light

~Miss Christina C~